ERP User Manual
Purchase
The Purchase Module in the ERP system is designed to manage the procurement of items for the warehouse from external suppliers. It enables users to record, track, and monitor all purchasing transactions, ensuring efficient inventory replenishment and supplier management. This module plays a critical role in maintaining stock levels, managing vendor relationships, and keeping accurate financial records for purchases made by the organization.
 Figure 7: Purchase List Datatable
Key Columns Displayed:
- Date – The date the purchase was created.
- Reference – The unique reference code for the purchase.
- Supplier – Name of the supplier associated with the purchase.
- Purchase Status – Indicates whether the purchase is Pending, Ordered, or Received.
- Grand Total – Total cost of the purchase, including all items and applicable taxes or discounts.
- Returned Amount – Amount returned to the supplier (if any).
- Paid – Total payment already made.
- Due – Remaining unpaid amount.
- Payment Status – Displays whether the payment is Paid, Partial, or Unpaid.
- Actions – Options to View, Duplicate, Edit, View Payment, Add Payment, or Delete the purchase record.
On the Purchase Index page, users can view a list of all recorded purchases
displayed
in a structured
DataTable. Each row includes an Action dropdown button  that provides
several options to manage purchases (see Figure 7). On the top of the datatable, user also can
find Add
Purchase button
that provides
several options to manage purchases (see Figure 7). On the top of the datatable, user also can
find Add
Purchase button  which will direct
the user to the add purchase form when user click it. Besides that, user can also navigate to
which will direct
the user to the add purchase form when user click it. Besides that, user can also navigate to
 in the sidebar, under the
Purchase dropdown nav to open the form.
in the sidebar, under the
Purchase dropdown nav to open the form.
Add Purchase
To record a new purchase transaction, users can click the Add Purchase button. This action opens the purchase entry form, where detailed information can be entered for a complete and accurate record of the transaction.
 Figure 8: Add Purchase Form (Section 1)
Purchase Details and Product Selection
Based on the Figure 8, users are required to provide the following information:
- Date – The purchase date.
- Reference Number – Unique identifier for the purchase.
- Warehouse – Select the destination warehouse using a dropdown list.
- Supplier – Choose the supplier from the dropdown (selectpicker enabled).
- Purchase Status – Define the current status: Received, Partial, Pending, or Ordered.
- Attach Document – Upload any relevant documents (e.g., invoice, purchase slip).
- Currency – Select the transaction currency from the dropdown.
- Exchange Rate – Set the exchange rate if the selected currency differs from the base currency.
Users can add products by searching via product code or name  . Once selected, product details such
as name, code, quantity, unit cost, discount, tax, and subtotal will be reflected in the
order
table which consists of column:
. Once selected, product details such
as name, code, quantity, unit cost, discount, tax, and subtotal will be reflected in the
order
table which consists of column:
 Figure 9: Order Table
- Product Name & Code – Auto-filled from the product selection.
- Quantity – User must enter the quantity to be purchased.
- Batch Number– Mandatory field to track product batches for inventory and compliance purposes. (Fill by user)
- Expiry Date – Required for perishable or regulated products. (Fill by user)
- Net Unit Cost – Auto-filled base price of the product.
- Discount – Auto-filled discount for the product.
- Tax – Calculated automatically based on the product tax settings
- Subtotal – Auto-calculated based on quantity, price, discount, and tax.
Multiple products can be added to the same order. The table dynamically updates item totals as users enter quantity or pricing information.
View Purchase
The View Purchase page allows users to review the complete details of a selected purchase record. It provides a read-only summary of all purchase-related data to support transparency, record tracking, and auditing
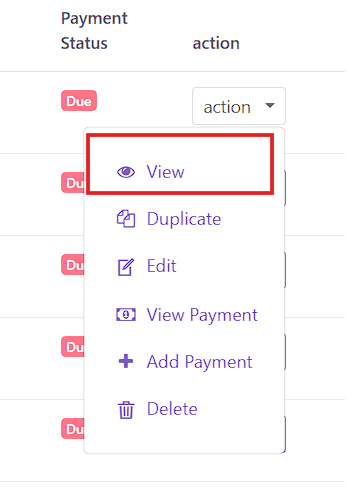 Figure 9: View Purchase Button
To access the view page, click the View label under the Action button from the Purchase Index table (Figure 9).
 Figure 10a: View Purchase Page (Top)
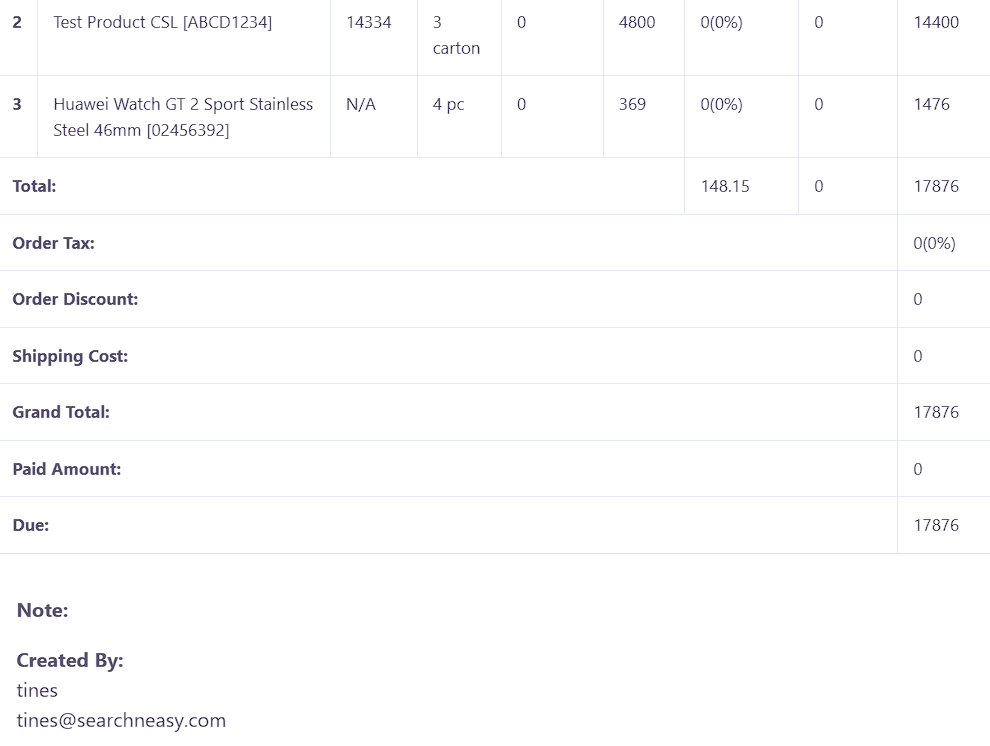 Figure 10b: View Purchase Page (Bottom)
In the view page, user can also print the purchase details by clicking on the icon
Print  . The top section of the
View Purchase page displays general purchase information,
including:
. The top section of the
View Purchase page displays general purchase information,
including:
- Date: The date of the purchase entry.
- Reference No: The unique reference number of the transaction.
- Purchase Status: The current status of the purchase (e.g., Received, Pending).
- Currency: The currency used in the transaction.
- Exchange Rate: The rate applied if the transaction is in foreign currency.
- From: The supplier or source of the purchase.
- To: The receiving warehouse or location.
The central part of the page contains a table listing all purchased items. Each row in the table includes:
- Product Name
- Batch Number
- Quantity
- Returned Quantity
- Unit Cost
- Tax
- Discount
- Subtotal
At the bottom of the page, a purchase summary is shown with the following financial breakdown:
- Tax
- Order Tax
- Order Discount
- Shipping Cost
- Grand Total
- Paid Amount
- Created By: The user who recorded the purchase
Edit Purchase
The Edit Purchase page allows users to update the details of an existing purchase. This is useful for correcting errors, updating quantities, or modifying supplier-related information before finalizing records.
 Figure 11: Edit Purchase Button
To access the edit page, click the Edit label under the Action button from the Purchase Index table (Figure 11).
 Figure 12: Edit Purchase Page
When accessing the Edit Purchase page, users will see a form that is pre-filled with the existing purchase information. Users can modify all the fields except the reference number.
Users can also edit the product selection section:
- Search and select products by code or name.
- After selection, fill in quantity, batch number, and expiry date.
- The order table updates automatically with unit cost, tax, discount, and subtotal for each product.
At the bottom of the form, users can update order-wide details such as order tax, order discount, shipping cost and any additional notes related to the update. Same like the add purchase form, the form footer displays a real-time Purchase Summary. After making the necessary updates, click the Submit button to save changes. The system will validate inputs and update the purchase record accordingly.